Workflow in MetaModels
The workflow for mapping your own data structure in MetaModels is broken down into individual steps that must be carried out in sequence for each MetaModel. The following description is aimed at beginners in MetaModels and was created based on “best practice” — experienced users will combine and supplement certain steps directly.
The individual steps are described in more detail in the further articles of the Components of a MetaModel section.
Step 0: Concept of the Data Structure
The total number of MetaModels and their links create a database structure with which data can be stored, output and filtered in the desired way. Good planning helps to avoid subsequent changes, especially for more complex tasks.
It is recommended to record the structure of MetaModels and their links graphically. This helps both during creation and for documentation.
In addition to classic relations such as single (1:n) or multi-link (m:n), MetaModels also offers further options — more about this in the article Relations in MetaModels.
In the simplest case, you can sketch the schema on paper with a pen — but there are also various tools available, such as yEd or the online version yEd live.
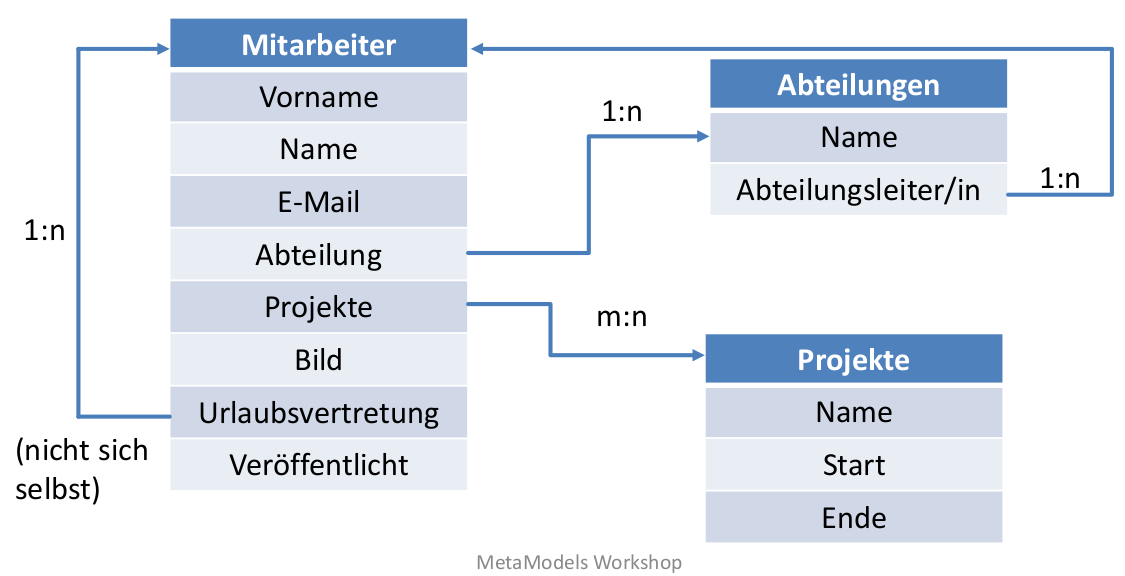
As an example, a structure for employees including links to department and projects, and a self-reference for holiday substitution:
For data storage and relations in MetaModels, corresponding attributes are required — which ones are available can be found on Storing Data Types as Attributes.
This also allows you to select which MM packages need to be installed in addition to the core.
Step 1: Basic Settings for a MetaModel
For the basic settings, the most important settings are pre-selected, so only the most necessary
information and selections need to be made. For easier orientation of where to find what, the
"MM layout map" is available for download.
- 1:
 Create new MetaModel
 Set up multilingual support if necessary
After saving, the icons can be accessed from left to right as follows
- 1:
- 2:
 Create attributes
 After creating all attributes, run the DB migration (Contao Manager or console) and clear the cache
- 2:
- 3.a:
 Create render setting
 Basic setting for the list view
- 3.a:
- 3.b:
 Add attributes to render setting
 Determines which attributes are available in the respective list for a view
- 3.b:
- 4.a:
 Create input form
 Basic setting for the input form
- 4.a:
- 4.b:
 Add attributes to input form
 Determines which attributes are available in the respective input form for a view
- 4.b:
- 5:
 Create input/render assignments
 Select and save the created render setting and input form
- 5:
When step 5 is completed, the new MetaModel should appear on the left in the Contao navigation in the “METAMODELS” section.
You can and should now enter the first test records.
Step 2: Basic Output
1: Create a page and article in Contao
2.a: Create a content element “MetaModel list” in the article
2.b: Select the created MetaModel and the render setting in the MetaModel list and save
In the frontend, a list with the entered test records from step 1 should now be visible on the created page.
Step 3: Adjusting Settings from Step 1
- 1: Adjust MetaModel
Activate variants if required for the data structure
- 1:
- 3.a: Adjust render setting
Create specific render setting, e.g. for list output in the frontend
Select the template variant “metamodels_prerendered” for custom output
Set the “jumpTo” page for detail view
- 3.a:
- 3.b: Adjust attributes in render setting
Make specific settings for attributes — e.g. output of images including image size
Select template variant “mm_attr_ for custom output
- 3.b:
- 4.a: Adjust input form
Specify keys for output of filter, search, sorting, limit
Select the backend section where the MetaModel should appear, e.g. content or custom section
Display as table in the backend
Permissions for editing
- 4.a:
- 4.b: Adjust attributes for input form
CSS class such as w50
Required field, read-only (Readonly)
Option whether the attribute should be filterable and/or searchable in the backend list
Add legends to logically subdivide larger input forms
- 4.b:
- 4.c:
 Create sorting/grouping
 Create default sorting or further sortings for selection in list
- 4.c:
- 4.d:
 Create visibility conditions
 Input widgets can be shown or hidden based on values of other widgets
- 4.d:
- 5: Create input/render assignments
Assign selection of render settings and input forms to user groups (BE) or member groups (FE)
- 5:
- 6.a:
 Create filter
 Assign a name for the filter
- 6.a:
- 6.b:
 Create filter rules
 Insert filter rules
Nesting with AND or OR is possible
Without further specification, all filter rules are automatically linked with AND
- 6.b:
With the adjustments made, the display in the backend and frontend should match the individual requirements.
In addition to the options listed, there are further possibilities that can be read on the linked pages.
Step 4: Further Output Options from Step 2
- 2.c: Content element “MetaModel list” from step 2
Select filter
Define sorting by an attribute — see also special sorting or sorting links
Set limit and pagination
3.a: Create a content element “MetaModel filter” in the article
3.b: Select MetaModel and the filter (usually the same as from the MM list) with the desired filter rules
On the page, a filter with corresponding filter widgets should be visible in the frontend and the list should respond to the filtering.
The frontend output can be adjusted with various settings for Search Engine Optimisation (SEO).
Tips:
For “MM starters”, it is recommended to build the “First MetaModel” example
Print out and keep the
"MM layout map"handyRepresent the data structure graphically — not all attributes need to be entered — it helps during construction and communication with customers and support requests
When creating models, work “from the outside in” — in the example above, first create Department and Projects, then Employees — so that the models are already available when creating attributes for references (here the single select)
For larger data structures, related models can be given a common “prefix” such as “events”, so that the tables are named e.g. “mm_events_categories”, “mm_events_contacts”, etc. — the model table can then be filtered by “mm_events_” and is easier to work with
Create similar attributes one after another — with “Save and new”, the previous attribute type is retained, saving the selection
For “helper information” such as salutations, units of measurement, etc., you don’t need to create a MetaModel as a reference each time — for example, a helper model construct can solve this
After creating a model or attribute, run DB migration and clear the cache
Before starting, check whether you need the models or attributes to be multilingual — a later switch is not easy
Adding attributes to render settings and input forms is simplified with the “Add all” button
There are a number of checklists that help with the work
Help is available in the Forum and on Slack (#metamodels) — you can also get coaching on projects from the MM team (mail@metamodels.me)